DREAMWEAVER - USING LAYERS FOR LAYOUT
From Tables to Layers..
The way that we have been using Dreamweaver and, to a smaller extent, Fireworks, to produce HTML layouts up to this point has involved using TABLES to position elements on the page. There is a much more flexible solution that allows for elements to be not only spaced accurately around the page but also allows them to be overlapped with a degree of transparency. This is an extension of Cascading Style Sheets and it is known as LAYERS.
A layer is a container for HTML content, usually delineated by the DIV or SPAN tag, that you can position anywhere on a page. Layers can contain text, images, forms, plug-in objects, and even other layersany element you can place in the body of an HTML document you can also place in a layer.
Layers provide Web page designers fine control over the exact pixel placement of elements. By putting page elements in layers, you can control which objects appear in front of each other and which ones are displaced or hidden. You can also attach behaviours to links to control Layer visibility or use a timeline to move a layer or several layers simultaneously across a screen.
The main drawbacks to using Layers up until recently has been patchy support for them under older (pre version 4) browsers and between browsers. Netscape tried to write the book with it's own version of layers called iLayers (not supported by I.E.). As the majority of net users gradually upgrade their browsers this will become less of a problem.
Positioning properties for layers include:
- LEFT and TOP (X and Y co-ordinates, respectively)
- Z-INDEX (also called the stacking order) Higher Z-index numbers on
top
- VISIBILITY (Hidden, Visible, Inherit, Default)
Note that layers can have individual background colours or images as required.
![]()
EXERCISE:
In DREAMWEAVER create a new document and create a layer using INSERT > LAYER
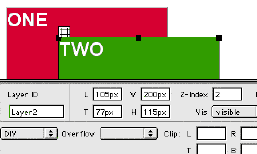
Use the Layer's Selection Handle (if it is not visible - click anywhere in the layer) - Select a background colour and type "LAYER ONE" into the layer. Use the selection handle to drag it to 200pixels down and 200 pixels across. If you cannot move the layer accurately, type the L (LEFT) and T (TOP) values into the property inspector.
DRAW A NEW LAYER - Select the DRAW LAYER button in the OBJECTS palette - note that the cursor becomes a CROSS-HAIR - Click and drag to draw a new layer on the page. Use the Selection Handle to drag this layer so that it partially covers Layer One - set a different background colour and type in "Layer Two" - Preview in Browser.
CHANGE THE Z-INDEX - The Z Index dictates which layers are on top of which - the higher the number the higher in the stack. Using the LAYERS PALETTE (under WINDOWS > LAYERS ) select Layer One and Change it's Z-Index to THREE - preview in Browser.
NESTING LAYERS - Note that you can contain a new Layer within an existing one by DRAGGING the DRAW LAYER button in the objects palette into an existing layer. This is known as a PARENT - CHILD set - if you move the Parent the Child goes too.
EXERCISE:
Earlier in the semester we created a simple layout for a Rhinoceros Beetle webpage. This was created using tables. Recreate the same page using a layer for each object in the layout.
The folder is provided here in ZIP format for you to download, expand and work on in class.
ADVANCED EXERCISE:
You can modify the visibility of layers by adding BEHAVIOURS to links. In this instance we will need to add a behaviour to show a hidden Layer on MouseOver then hide the layer on MouseOut. Create a new page and create two Layers with text saying "Layer One" and "Layer Two" respectively (as in the first exercise) - set different backgound colours.
- In Layer One above - highlight the text and insert a dummy link (type a "hash" symbol # in the links box of the property inspector)
- Select Layer Two and set it's VISIBILITY to HIDDEN - it should disappear when you deselect.
- Select the linked text in Layer One - go to the BEHAVIOURS Palette, select the "+" symbol to add a new behaviour and select SHOW - HIDE LAYERs. Select LAYER TWO > SHOW then go OK. Under EVENTS in the Behaviours Palette, select the behaviour and CLICK ON THE MENU ARROW - select "onMouseOver".
- We still need to Hide it again when we are done so with the text link still highlighted, go to the BEHAVIOURS Palette, select the "+" symbol to add a NEW behaviour and select SHOW - HIDE LAYERs. Select LAYER TWO > HIDE then go OK. Under EVENTS in the Behaviours Palette, select the behaviour and CLICK ON THE MENU ARROW - select "onMouseOut".
- Preview in Browser to check that it works
This tutorial only just begins to introduce the concept of Layers. Consult the D/W Help Files for detailed information on handling Layers.