DREAMWEAVER LAYOUT EXERCISE - FLUFFY PUPPY
Nothing quite as fluffy, as FLUFFY PUPPY....
This one is especially for the Monday WEB DEV TOOLS group - you have been asking to build a whole site and for more practical exercises - here it is.
We will be using Dreamweaver (D/W) to create a simple four page website called FLUFFY PUPPY. Pre-prepared image files will be made available in class. Basically there is a simple front page with three second-level contents pages linking off it.
The image files have been posted to the server and are available as a set of files in ZIP format - Use WinZip to extract and repeat the exercise - Go get 'em
The aim of the exercise is to build the site around the graphics by creating table layouts in Dreamweaver, inserting images, rollover images, text and backgound images - some of the features to be included in your site:
- Page layout using tables in Dreamweaver (D/W)
- Rollover images for buttons
- Alt text for ALL images
- Linking buttons
- Text navigation on each page
- Setting colours for text, background, links etc.
- Including page titles
A small example site has been added to this tutorial site - here's one prepared earlier (will open new window)
STEP ONE - SITE MAP:
Work out your site map. In doing this you can give a name to each file in the site (yet to be created) - this will help when setting up links manually in D/W . Here is an example for this simple site - you can name your files whatever you want as long as it makes sense to you but remember - use lowercase for file names, no spaces and use correct and consistent spelling each time.
If you were creating a site from scratch, the site map is important because it helps work out what goes where in the site and gives a clear idea of how the navigation in the finished site will work and what buttons will be needed.
Remember that when starting a new D/W project, you should set up a NEW SITE and define a local root folder to hold the files required for the site. ( see also the earlier D/W tutorials on this site)
![]()
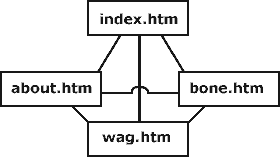
A simple site map... ( image map )
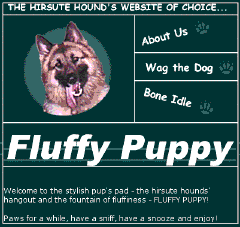
STEP TWO - FRONT PAGE:
In D/W save a new document as "index.htm". This will be the front page.
Insert a table with SIX ROWS and TWO COLUMNS as shown at right. File names are as follows:
- tag1.gif
- pup1.gif
- ib_about.gif ( ib_about_f2.gif - rollover image)
- ib_wag.gif ( ib_wag_f2.gif - rollover image)
- ib_bone.gif ( ib_bane_f2.gif - rollover image)
- title1.gif
You will need to MERGE CELLS to fit the images in with ROWSPAN AND COLSPAN as required. The sixth row is text. For the buttons choose INSERT > ROLLOVER IMAGE.
Use MODIFY > PAGE PROPERTIES to set page Background Colour, Page Title, text colour, link colours etc. The table needs to be centre aligned on the page.
SET UP BUTTON LINKS - select each button in turn and type the required file name into the "Link" box in the Property Inspector.
If you can, insert "bg1.gif" as a background image and work out how to align the table with the background image - 25 pixel shift down from top.
STEP THREE - SECOND LEVEL PAGES:
Since the three second level pages "about.htm", "wag.htm" and "bone.htm" are all based on the one graphic page layout (but different from "index.htm"), the fastest method is to set up a common "template" page, set up links, "alt" tags, text links, layout etc., GET IT ALMOST COMPLETE, then duplicate the page as "about", "wag" and "bone". This saves a lot of time by only having to set up once. See also earlier tutorial on sites in D/W.
Save a new D/W page as "temp.htm" - insert a table 100% wide, 3 ROWS, 2 COLUMNS, Border =0
Left Column = 159 wide Right column = 90% wide - this will ensure the right column always expands as much as possible and means the page layout will be flexible with monitor areas.
Choose the top two left cells over the first two rows and MODIFY > TABLE > MERGE CELLS - insert "pup2.gif"
Insert "title2.gif" in the top right cell and "head_wag.gif" in the row beneath.
![]()
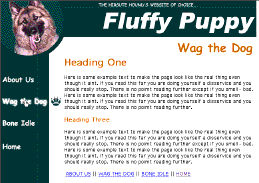
BUTTONS: In the bottom left cell insert "b_spacer.gif" then put in a SOFT RETURN or LINE BREAK - use SHIFT + ENTER.
Now go to INSERT > ROLLOVER IMAGE and choose the two states for the about button ( eg: b_about.gif and b_about_f2.gif ). Put a soft return after and insert next button - continue for other buttons.
Set up links for all buttons and alt tags for all images - do it now and you will only have to do it once. Finally set up text links down the bottom of the page
BACKGROUND IMAGE : To set a background image for the page, use MODIFY > PAGE PROPERTIES and set "images/bg2.gif" as the background image, set the page title and SET ALL MARGIN VALUES TO ZERO.
Select the top two right hand cells and align them to the right - set the BACKGROUND IMAGE VALUE FOR THE TOP RIGHT CELL to "images/bg2_top.gif"
It is hard to explain but the effect is that the green stripes will now run all the way across the top of the page and all the way down th page no matter how large the monitor size.
STEP FOUR - CREATING FINAL PAGES:
Once the temp.htm file is complete (put some junk text in the last cell for appearance sake) we need to duplicate it to create the final pages for the site.
SAVE IT then go SAVE AS > "about.htm", then again SAVE AS > "wag.htm" then finally SAVE AS > "bone .htm". All pages now exist and if the links were correct the entire site should now be linked.
FINALLY:
Having created all our pages, now it is time to re-open each page in turn, set up the page titles, change the graphic banner headings and insert content for each.
Take a look at the one prepared earlier. (will open in new window)