
INTRODUCTION TO TABLES USING DREAMWEAVER
These instruction pages are good examples of the principles of web page layout using HTML Tables in DREAMWEAVER to get started in web design. All structural tables have been left visible with a grey border to help define table cells.
The other main method for HTML page layout involves using LAYERS. More about these as the class progresses.
![]()
TO START WITH:
- Create a new page using FILE > NEW.
- SAVE the new page and name it.
- Remember that the file name must end with either .htm or .html to be seen as a valid web page.
INSERT > TABLE:
- The following dialogue box appears (right):
- Set the number of Rows and Columns
- Note that WIDTH can be either a percentage or Pixels
- Border - if this value is set to "0" then they will be invisible in the Browser.
You will now have a blank table made up of two columns and five rows for a total of ten cells:
MERGE CELLS = COLSPAN:
To merge two or more table cells together (EG: The banner at the top of this page) select and highlight the cells by clicking and dragging over them, then go to the MODIFY menu and choose TABLE > MERGE CELLS. This unites the cells and allows some text and images to span the whole table rather than being limited in width.
BORDER, CELL PADDING & CELL SPACING:
Three values can be set for spacing cells out in HTML Tables:
- BORDER - Draws a border round the table of X pixels - want that outdated look for your site? try TABLE BORDER="20" COLOUR ="RED" - so retro - so nineties.
- CELL PADDING - space between edge of cell and the content
- CELL SPACING - space surrounding each cell
Note that separate background colours can be assigned for individual rows, columns or cells and that unless specified in a CSS style sheet, FONT tags must be written for each individual cell - you cannot assign a font to a whole table.
IN CLASS:
We will be recreating and experimenting with a demo page called rhino.htm - a working example is attached. The a ssociated image files will be provided.
COLLAPSING CELLS:
In the third row of the table on the page you are now reading from - you see an image side-by-side with a column of text. Using Table columns in this way is one of the only ways to get text to sit beside an image using HTML tables. One of the problems of HTML Tables is that if a Column or Row can collapse then it will - leaving an unbalanced page with text often squashed up on one side with white space on the other.
The single pixel image trick : One common workaround for this is to create a TRANSPARENT, 1PX BY 1PX GIF IMAGE using photoshop, then placing it in the column that needs to be "jammed open" so to speak, and RESET IT'S WIDTH so that it fills the required space. There is an example of this on the line above the words " TO START WITH" above.
There are many ways to use tables to lay out a HTML page - we will go through more in class.
MULTIPART IMAGES IN TABLES:
There are a number of reasons you may want to slice your images up and reassemble them in tables in HTML:
- Rollovers - It is more efficient to swap small parts of an image than the whole image including the parts that do not alter in the rollover
- Animations - Similarly, the smaller the area being animated the smaller the image file size
- Better image optimization - Separate parts of a large image can be optimised for different formats - as either JPG files or some parts may be 32 colour GIFS while other simple areas be only eight colour GIFs - each part will be smaller.
- Image Maps - Break an image up and link individual parts rather than using image maps - allows ALT tags for each element.
Here is a simple example of an image sliced up and reassembled in a table ( and yes there may be an error in the code .. work it out..) :
 |
 |
 |

|
{REF: "Web Design in a Nutshell" Jennifer Niederst, O'Reilly & Assoc. 1999}
PAGE TITLE AND BACKGROUND COLOURS/IMAGES:
Got to the MODIFY menu and choose PAGE PROPERTIES:
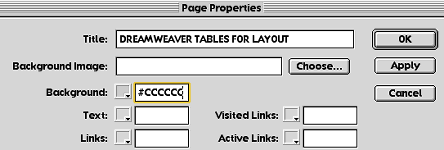
Using this menu you can set the page title which appears in the header of the web browser and also in the GO menu of the browser . This menu can also be used to choose a background image for a web page if required or to set the background colour of the page. If the Background colour is not set then it will default to the user's browser settings. You can also change text and link colours.