DREAMWEAVER: Setting up a simple website (text only)
This exercise is about setting up a simple text-only website with just four contents pages. The stages to go though are (very briefly):
- Site Map (Decide site content and structure)
- Create master Template page
- Set up Links
- Duplicate Template as multiple contents pages
- Modify page properties and insert content
BEFORE YOU START
See earlier tutorial on Introduction to Dreamweaver
regarding protocols for setting up a Web Project folder.
DEFINE A SITE
Under the SITE menu choose NEW SITE - the site definition window appears. Under LOCAL INFO enter a new SITE NAME for this web site exercise.
Dreamweaver also needs to know which folder will contain all the files for the web site - known also as the ROOT FOLDER - click the folder icon to browse. Create a new folder for this project called "test_ site" then choose SELECT - you should save all your future HTML files for this exercise into this folder.
SAVING YOUR PAGE
When Dreamweaver is opened, a new file "untitled.htm" should be created (if not, select FILE>NEW) - save this file as "temp.htm".
(NOTE ABOUT TEMPLATES: Dreamweaver can create special .dwt template files which can assist developing larger sites with multiple users inputting content. In this exercise we are NOT using .dwt files - we are using a plain HTML file as a master page for duplication - hence do not use "Save as Template". More about .dwt files later in the semester.)
TEMPLATE
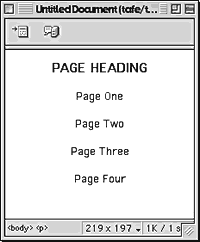
Set up the contents of the page with a heading and four lines of content
as shown at right:
FINISHED SITE
See an example of this completed exercise here
![]()

This will be the common layout for all four content pages.
LINKING
Highlight the words "Page One" and using the property inspector (CNTRL + F3 to show) add a new link by clicking in the LINK box and typing "one.htm" - this will link to the page named "one.htm". Repeat for the other lines adding links to the files "two.htm", "three.htm" and "four.htm".
Although these files do not exist yet, it is faster to set up the links before generating these pages from the master template. Save your "temp.htm" file.
DUPLICATE FILES
Now we can create the four content files from the template. Go to SAVE
AS and call the file "one.htm". Go straight back to SAVE AS
and call it "two.htm" then repeat SAVE AS with "three.htm"
and "four.htm". It is important that the file names that were
set up as links are spelled identically to the file names that you create
- any variation will mean that the links will not work. The linked text
will now show up blue with an underline to indicate a link.
MODIFY PAGES
Having set up links and created pages for our small website, open all four content pages in turn and change "PAGE HEADING" to "Page One", "Page two" etc., and set the title for each page as well. The HTML page title is the words that will appear in the top bar of the browser window and in the GO and HISTORY menus of the browser - set them by choosing MODIFY>PAGE PROPERTIES. You can set custom font colours, page background colours etc. in this window.
At this stage if building a real site content would be inserted and formatted
in each page.
PREVIEW IN BROWSER - F12
Dreamweaver can be set up to automatically launch a browser to preview
the HTML page. Use the F12 button to launch the main browser and SHIFT
+ F12 to view in a secondary browser - set preferences using FILE>PREVIEW
IN BROWSER>EDIT BROWSER LIST